説明#
- 本文は、React 内の Context メカニズムを分析し、3 つの小さな段階に分けます。
- createContext
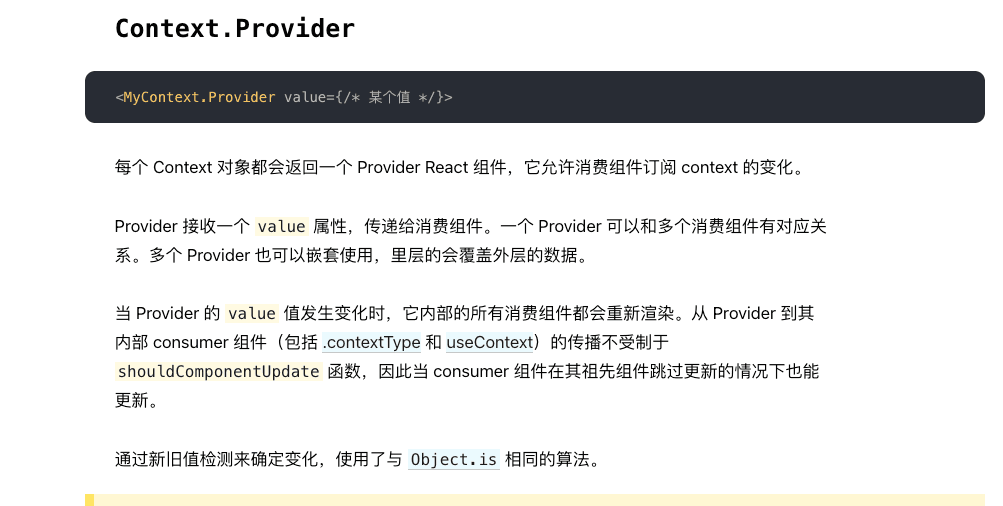
- context.Provider
- useContext
- デモは公式例に基づいています。
  const themes = {
    light: {
      foreground: "#000000",
      background: "#eeeeee"
    },
    dark: {
      foreground: "#ffffff",
      background: "#222222"
    }
  };

  const ThemeContext = React.createContext(themes.light);

  function App() {
    return (
      <ThemeContext.Provider value={themes.dark}>
        <Toolbar />
      </ThemeContext.Provider>
    );
  }

  function Toolbar(props) {
    return (
      <div>
        <ThemedButton />
      </div>
    );
  }

  function ThemedButton() {
    const theme = useContext(ThemeContext);
    return (
      <button style={{ background: theme.background, color: theme.foreground }}>
        私はテーマコンテキストによってスタイルが設定されています!
      </button>
    );
  }
createContext#
直接 createContext にブレークポイントを設定します。
  export function createContext<T>(defaultValue: T): ReactContext<T> {
  /**
   * contextを宣言します
  */
  const context: ReactContext<T> = {
    $$typeof: REACT_CONTEXT_TYPE,

    _currentValue: defaultValue,
    _currentValue2: defaultValue,

    _threadCount: 0,
    // これらは循環しています
    Provider: (null: any),
    Consumer: (null: any),

    // 同じ隠れたクラスをVMとServerContextで使用するために追加します
    _defaultValue: (null: any),
    _globalName: (null: any),
  };

  /**
   * beginWorkがfiberを作成する際に$$typeofに基づいて処理します
  */
  context.Provider = {
    $$typeof: REACT_PROVIDER_TYPE,
    _context: context,
  };

  let hasWarnedAboutUsingNestedContextConsumers = false;
  let hasWarnedAboutUsingConsumerProvider = false;
  let hasWarnedAboutDisplayNameOnConsumer = false;

  context.Consumer = context;

  return context;
}
内部では、context オブジェクトを宣言し、その上に Provider の属性を追加しています。
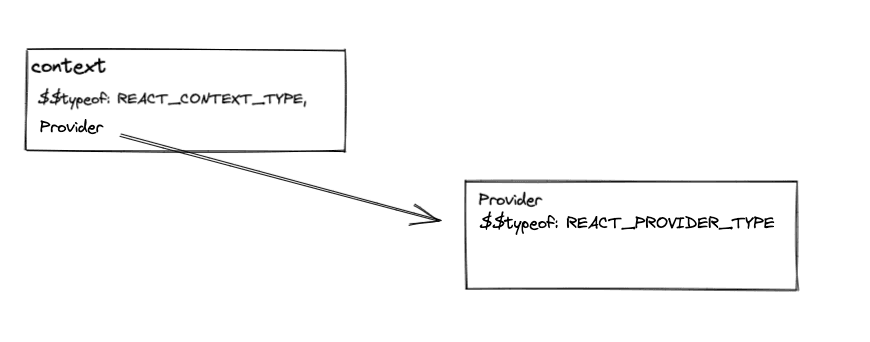
次に、provider 内での処理を見てみましょう。
context.Provider#
デモ内で Provider が使用されている場所を注意深く見ると、それが jsx の形式でプログラム内で使用されていることがわかります。
したがって、デバッグの考え方は明確で、beginWork 内で生成される fiber の場所を観察します。
App の return にブレークポイントを設定すると、以下の呼び出しスタックに入ります。
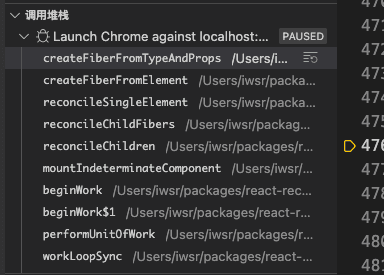
createFiberFromTypeAndProps 内で、最初に ContextProvider が fiberTag に割り当てられ、Provider 専用の fiber ノードを作成することを示し、その後 createFiber に入ります。そして、type が ContextProvider の fiber ノードが返されます。

この時点ではまだ App の beginWork 内にいるため、ContextProvider を観察するには次の beginWork に入る必要があります。

ここが正式に ContextProvider を処理する場所です。
function updateContextProvider(
  current: Fiber | null,
  workInProgress: Fiber,
  renderLanes: Lanes,
) {
  const providerType: ReactProviderType<any> = workInProgress.type;
  // createContextで作成されたcontextオブジェクト
  const context: ReactContext<any> = providerType._context;

  const newProps = workInProgress.pendingProps;
  const oldProps = workInProgress.memoizedProps;

  const newValue = newProps.value;

  // ここでcontextの_currentValueを新しい値に変更します
  pushProvider(workInProgress, context, newValue);

  if (oldProps !== null) {
    const oldValue = oldProps.value;
    // providerはvalueの前後を比較します
    if (is(oldValue, newValue)) {
      // 変更なし。子供が同じであれば早期に脱出します。
      // 変更がなく、子供が更新されていない場合は、元のfiberを再利用して退出します。
      if (
        oldProps.children === newProps.children &&
        !hasLegacyContextChanged()
      ) {
        return bailoutOnAlreadyFinishedWork(
          current,
          workInProgress,
          renderLanes,
        );
      }
    } else {
      // 前後のvalueが異なる場合、すべてのconsumersを更新します
      // ここでは一時的に展開せず、useContextの時に紹介します。
      // コンテキストの値が変更されました。マッチするコンシューマを検索し、更新をスケジュールします。
      propagateContextChange(workInProgress, context, renderLanes);
    }
  }

  // providerの子ノードを作成し続けます
  const newChildren = newProps.children;
  reconcileChildren(current, workInProgress, newChildren, renderLanes);
  return workInProgress.child;
}
updateContextProvider の考え方は比較的シンプルで、context 内の value を変更した後、新旧の値が等しいかを比較し、等しい場合は fiber ノードを再利用し、異なる場合は新しい fiber ノードを再作成します。唯一注意が必要なのは propagateContextChange です。これは useContext と一緒に説明します。
useContext#
嬉しいことに、この hook はマウントと更新を分けて説明する必要がありません。また、hook オブジェクトも生成されません。
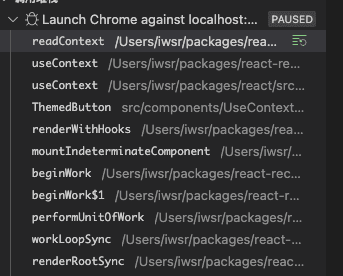
readContext 内で何が行われているかを直接見てみましょう。
この hook を使用する際には、対応する context オブジェクトを渡す必要があります。
const theme = useContext(ThemeContext);
export function readContext<T>(context: ReactContext<T>): T {
  /**
   * contextに渡されたvalueを取得します
   * */
  const value = isPrimaryRenderer
    ? context._currentValue
    : context._currentValue2;

  if (lastFullyObservedContext === context) {
    // 何もしません。すでにこのcontext内のすべてを観察しています。
  } else {
    // contextItemを作成し、後で現在レンダリング中のfiberノードにリンクリストとして追加します
    const contextItem = {
      context: ((context: any): ReactContext<mixed>),
      memoizedValue: value,
      next: null,
    };

    if (lastContextDependency === null) {
      // リンクリストを作成し、fiberノードにマウントします
      // このコンポーネントの最初の依存関係です。新しいリストを作成します。
      lastContextDependency = contextItem;
      currentlyRenderingFiber.dependencies = {
        lanes: NoLanes,
        firstContext: contextItem,
      };
      if (enableLazyContextPropagation) {
        currentlyRenderingFiber.flags |= NeedsPropagation;
      }
    } else {
      // 新しいcontextアイテムを追加します。
      // fiber上のcontext itemリンクリストに要素を追加します。
      lastContextDependency = lastContextDependency.next = contextItem;
    }
  }
  // 値を返します
  return value;
}
この時点での大まかな構造は次のようになります。
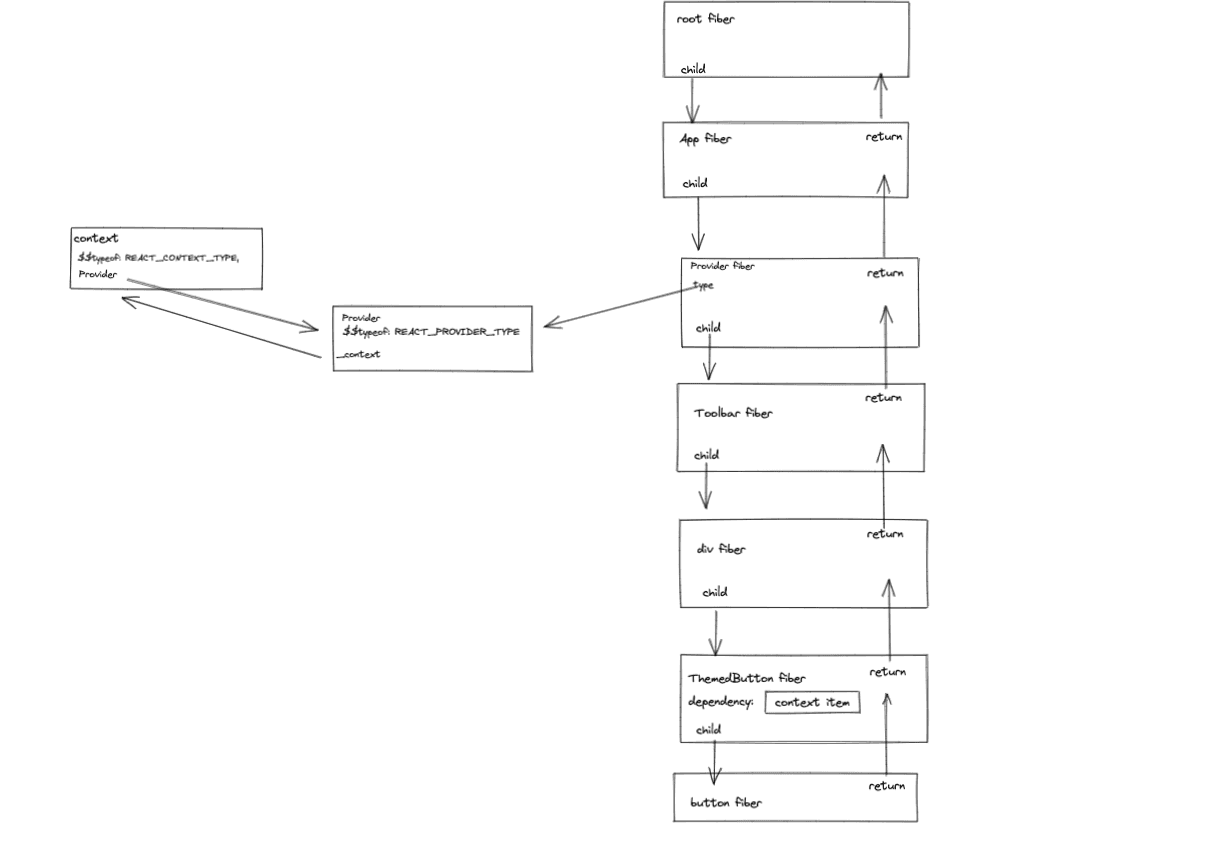
readContext は主に渡された context 内の値を読み取ることを行っていますが、なぜ現在レンダリング中の fiber ノードに context に関連するリンクリストを追加する必要があるのでしょうか?
ここで propagateContextChange を振り返る必要があります。
  function propagateContextChange_eager(workInProgress, context, renderLanes) {

    var fiber = workInProgress.child;

    if (fiber !== null) {
      // 子ノードのreturnポインタを進行中のfiberに設定します。
      fiber.return = workInProgress;
    }

    while (fiber !== null) {
      var nextFiber = void 0; // このfiberを訪問します。
      /**
       * fiberノード上のdependenciesはここで内部でcontextを使用している識別子として扱われます
      */
      var list = fiber.dependencies;

      if (list !== null) {
        // ここはcontextを使用しているシナリオです
        nextFiber = fiber.child;
        var dependency = list.firstContext;

        /**
         * ここでwhileを使ってcontext itemのリンクリストを走査し、現在のproviderにバインドされたcontextオブジェクトが存在するかを確認します
        */
        while (dependency !== null) {
          // contextが一致するか確認します。
          if (dependency.context === context) {
            // 現在のproviderにマークされたcontextオブジェクトを使用していることがわかりました
            // 一致しました!このfiberに更新をスケジュールします。
            if (fiber.tag === ClassComponent) {
              ...
            }
            // 現在のfiberに更新マークを付けます
            fiber.lanes = mergeLanes(fiber.lanes, renderLanes);
            var alternate = fiber.alternate;
            // 同様に、現在のWIPに対応するcurrentノードにも同じマークを付け、より高い優先度のタスクに挿入されて情報が失われないようにします
            if (alternate !== null) {
              alternate.lanes = mergeLanes(alternate.lanes, renderLanes);
            }
            /**
             * ここでは他の文書でも似たような操作が何度も言及されています(例えばuseState)
             * 実際にはrenderlanesのupdateを生成するシミュレーションを行っています
             * 更新を現在のノードからrootノードまで上にマークします。
             * そのため、スケジューリング時に一緒に更新されます
            */
            scheduleContextWorkOnParentPath(fiber.return, renderLanes, workInProgress); // リスト上の更新されたレーンもマークします。

            list.lanes = mergeLanes(list.lanes, renderLanes); // 一致が見つかったので、探索を停止できます。

            break;
          }

          dependency = dependency.next;
        }

      } else if (fiber.tag === ContextProvider) {
        ...
      } else if (fiber.tag === DehydratedFragment) {
        ...
      } else {
        ...
      }

      ...
      }

      fiber = nextFiber;
    }
  }
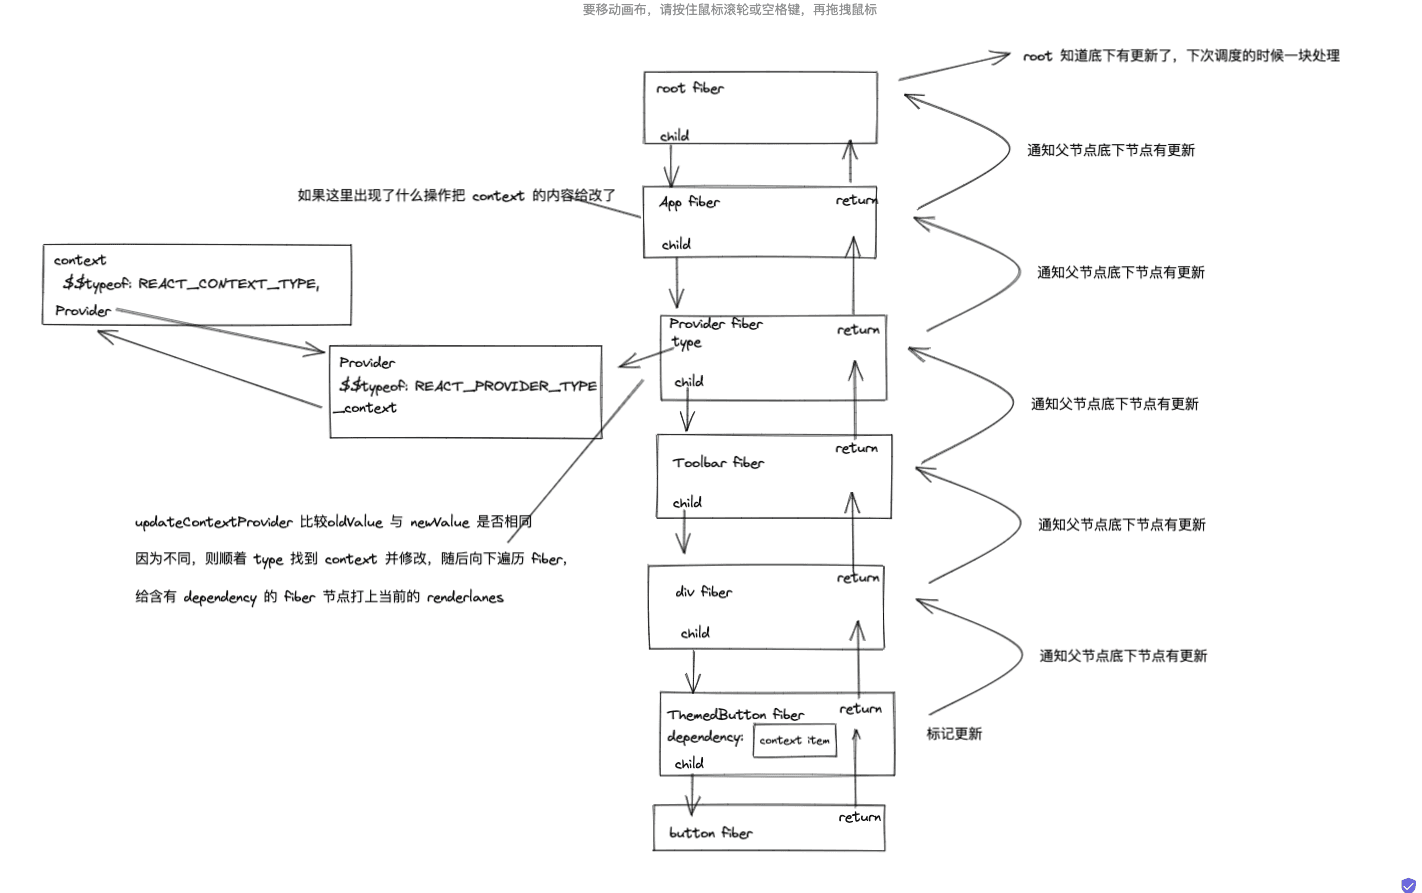
大まかにまとめると、context オブジェクトを使用している各 fiber ノードには dependencies のリンクリスト属性が付けられ、provider の value が変更されると、そのすべての子ノードを走査して dependencies のマークがあるかどうかを確認し、更新マークを付けることで強制的に更新を実現します。文書に記載されているように。
