TLNR#
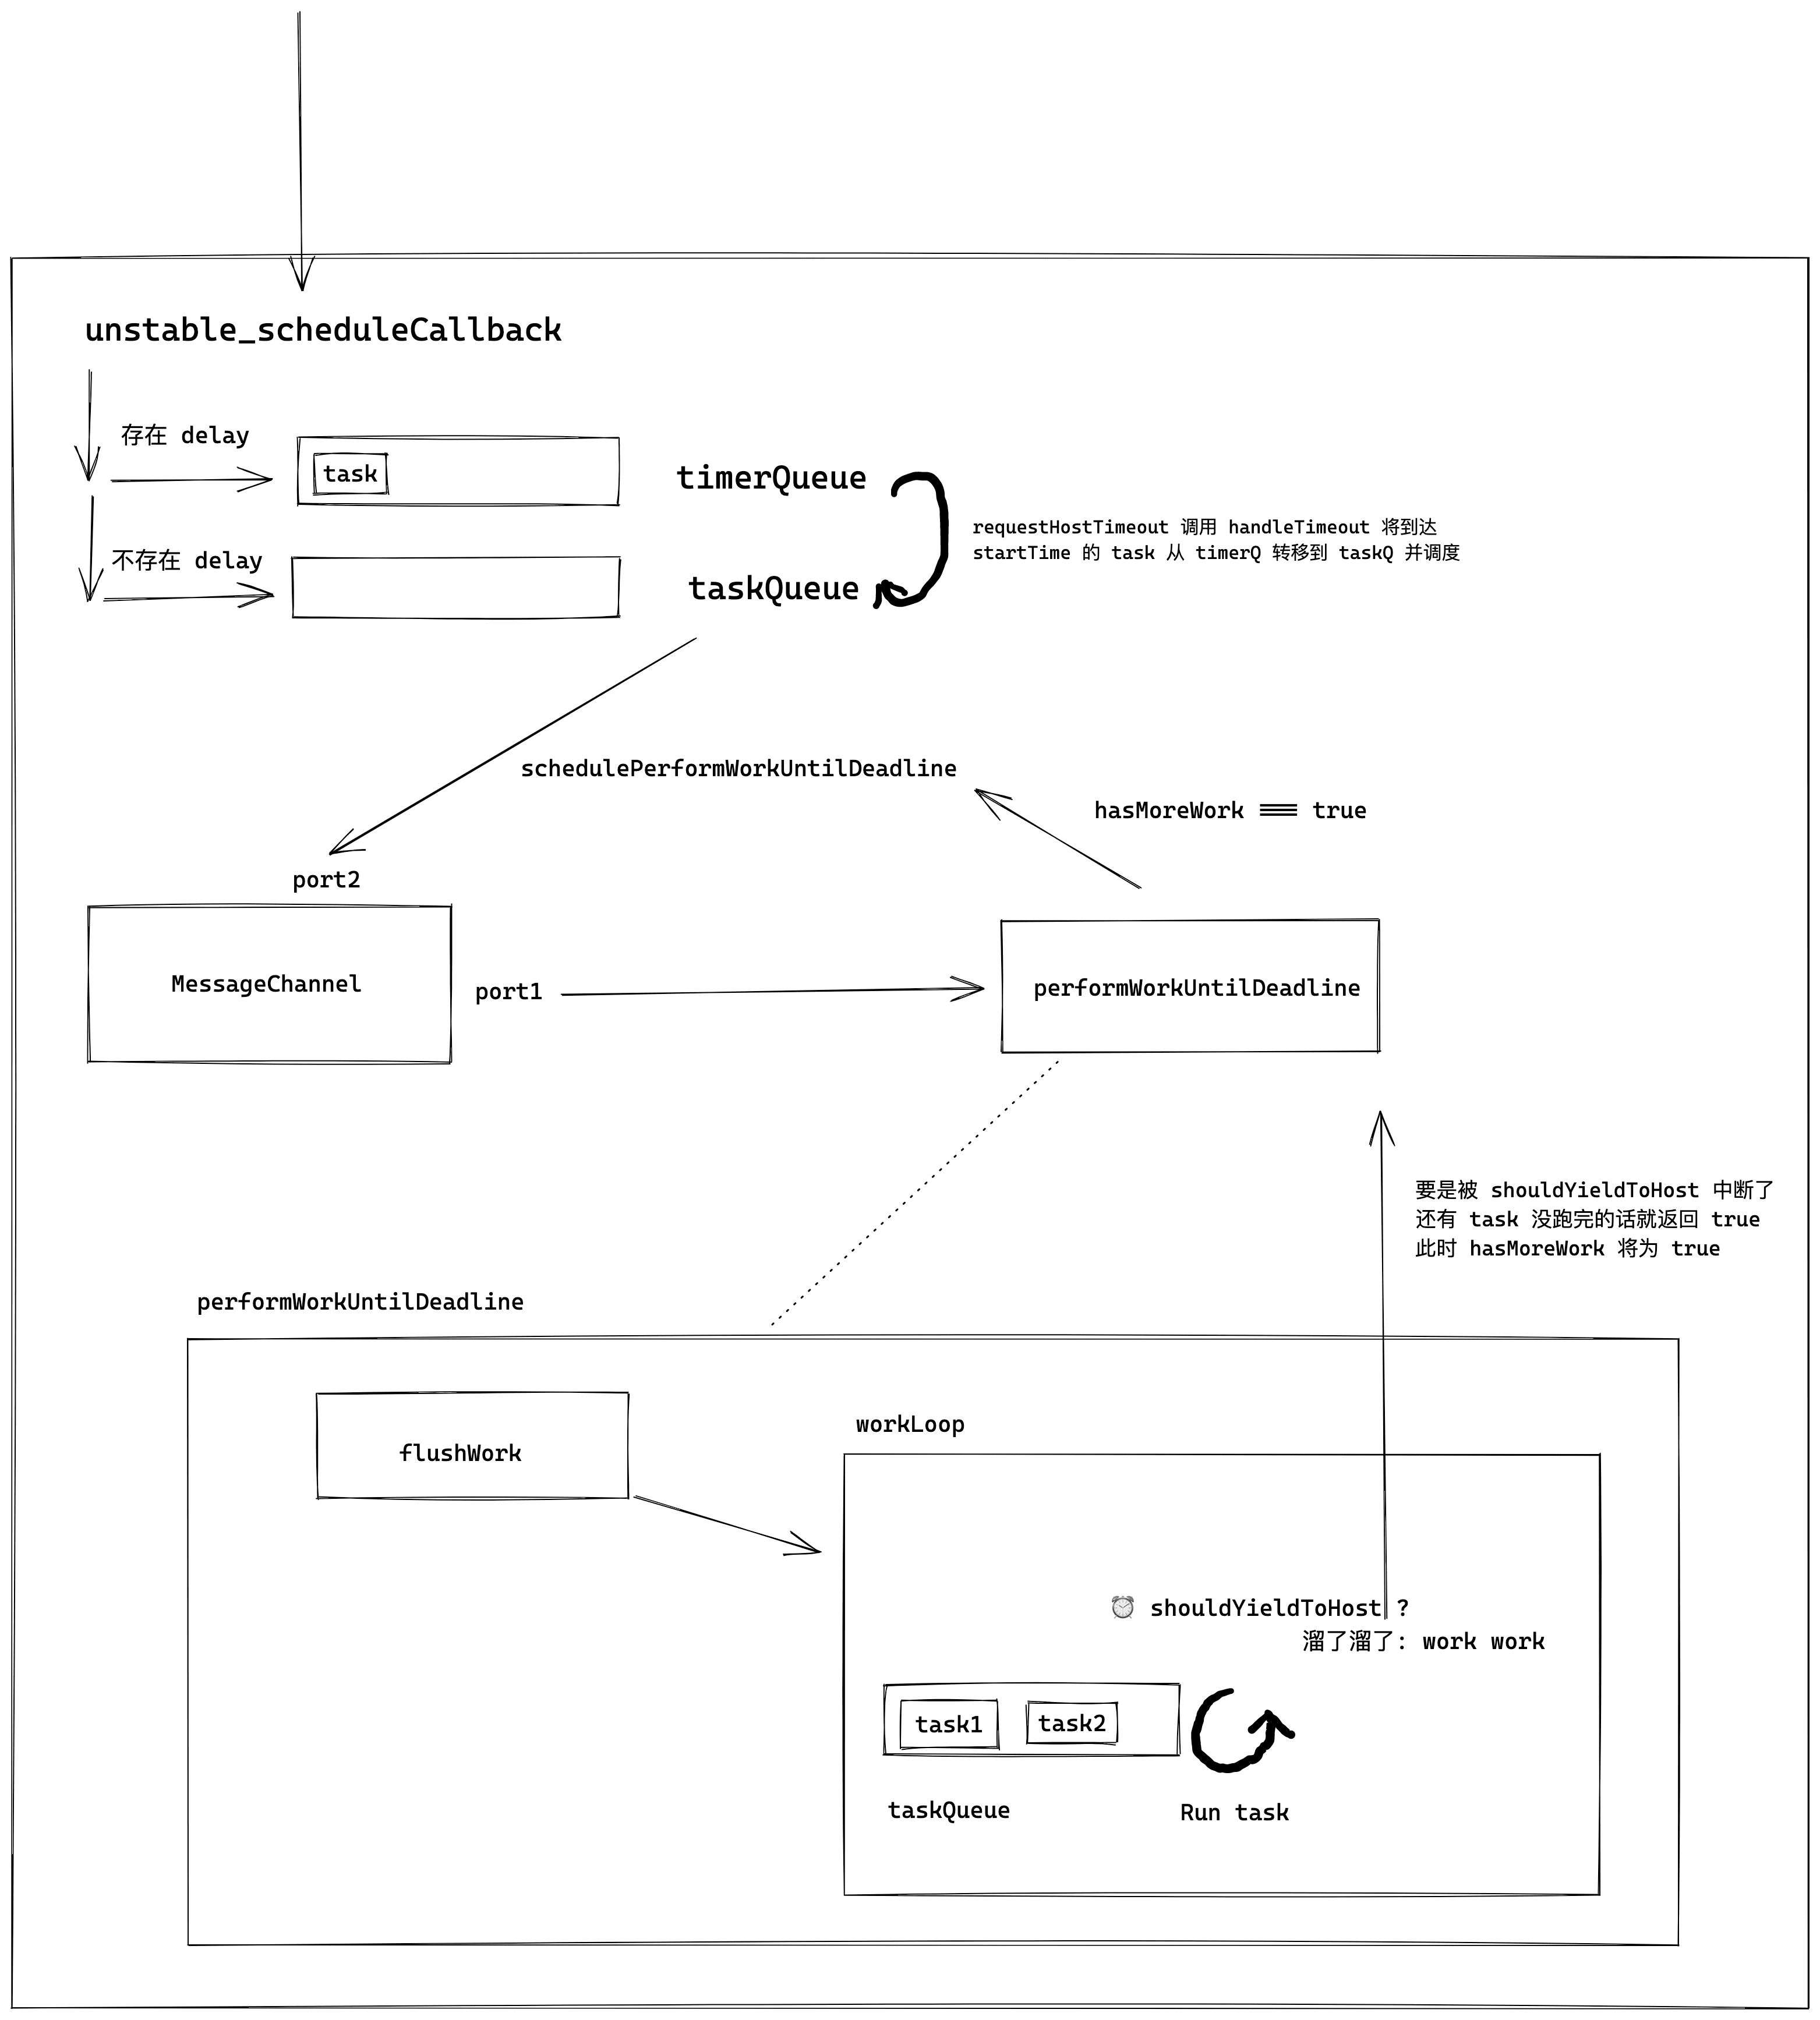
全文就是在畫下面這個圖

說明#
Scheduler 作為 react 內任務調度的核心是源碼閱讀繞不開的點(時間切片這一概念其實就存在於該包內),不過幸運的是,該模塊是獨立的一個包(可脫離 react 內的一些概念,因此邏輯十分乾淨),並且在打包後也只有小 700 行左右,因此閱讀難度並不算大。
在 Scheduler 內存在兩個概念,這裡提一下
- 優先級:Scheduler 內生成的 task 會根據優先級決定執行順序 (任務的過期時間),因此可以做到讓高優先級的任務儘快的被執行。
- 時間切片:JS 線程與 GUI 線程互斥,因此如果 JS 任務執行時間過長會阻塞頁面的渲染從而造成卡頓,因此引入時間切片(通常為 5ms)這一概念來限制任務的執行時間,一旦超時就打斷當前執行的任務,將主線程讓給 GUI 線程避免卡頓。
接下來本文將從 unstable_scheduleCallback 這一函數開始對源碼進行分析,該函數可以被視為 Scheduler 的入口函數。
unstable_scheduleCallback#
Scheduler 通過暴露該函數給外界以提供在 Scheduler 內註冊 task 的能力。閱讀該函數需要關注以下幾點
- Scheduler 會根據傳入的優先級(priorityLevel)生成具備不同過期時間的 task 對象。
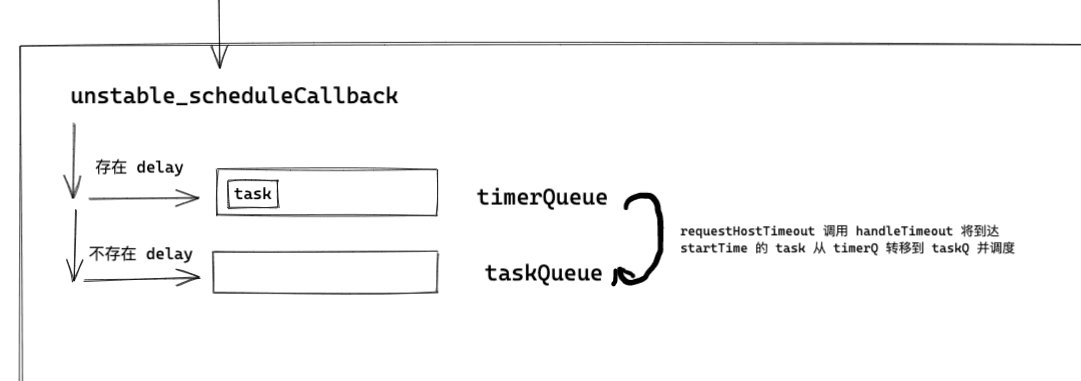
- Scheduler 內部存在兩個數組 timerQueue、taskQueue 用以管理 task,前者管理 delay > 0 的 task(並不急於更新的 task)、後者管理 delay <= 0 的 task(急於更新的 task)。
function unstable_scheduleCallback(priorityLevel, callback, options) {
  /**
   * 獲取函數運行時的當前時間,後面會根據優先級來計算該 task 的 startTime 與判斷
   * task 是否過期的基礎
   * */
  var currentTime = exports.unstable_now();
  var startTime;
  /**
   * 外界可能手動傳入 delay 以延後任務的執行
  */
  if (typeof options === 'object' && options !== null) {
    var delay = options.delay;

    if (typeof delay === 'number' && delay > 0) {
      startTime = currentTime + delay;
    } else {
      startTime = currentTime;
    }
  } else {
    startTime = currentTime;
  }

  var timeout;
  /**
   * timeout 根據優先級的不同會被賦予不同的值
   * 其中 ImmediatePriority 對應的 timeout 為 -1,因此此優先級的 task 在註冊時
   * 便可視為過期的,因此會被快速執行
  */
  switch (priorityLevel) {
    case ImmediatePriority:
      timeout = IMMEDIATE_PRIORITY_TIMEOUT; // -1
      break;

    case UserBlockingPriority:
      timeout = USER_BLOCKING_PRIORITY_TIMEOUT; // 250
      break;

    case IdlePriority:
      timeout = IDLE_PRIORITY_TIMEOUT; // 1073741823
      break;

    case LowPriority:
      timeout = LOW_PRIORITY_TIMEOUT; // 10000
      break;

    case NormalPriority:
    default:
      timeout = NORMAL_PRIORITY_TIMEOUT; // 5000
      break;
  }
  /**
   * 計算過期時間
  */
  var expirationTime = startTime + timeout;
  var newTask = {
    id: taskIdCounter++,
    callback: callback, // task 註冊的函數
    priorityLevel: priorityLevel,
    startTime: startTime, // 任務起始時間
    expirationTime: expirationTime, // 過期時間
    sortIndex: -1 // 小頂堆排序的依據
  };

  if (startTime > currentTime) {
    // This is a delayed task. 因為設置了 delay,所以這是一個需要設置定時器的 task
    newTask.sortIndex = startTime;
    // 把這個 task 塞到 timerQueue 內
    push(timerQueue, newTask);

    if (peek(taskQueue) === null && newTask === peek(timerQueue)) {
      // All tasks are delayed, and this is the task with the earliest delay.
      // taskQueue 為空且,當前 task 在 timerQueue 內排序最前
      if (isHostTimeoutScheduled) {
        // Cancel an existing timeout.
        cancelHostTimeout();
      } else {
        isHostTimeoutScheduled = true;
      } // Schedule a timeout.

      // requestHostTimeout 只是個封裝的定時器
      /**
       * handleTimeout 是一個啟動調度的函數,後面會分析到
       * 在這段代碼中可以暫時理解為啟動調度以執行當前的 task
       * */
      requestHostTimeout(handleTimeout, startTime - currentTime);
    }
  } else {
    /**
     * 未設置 delay 的情況下,就把 task 直接塞入 taskQueue 內
    */
    newTask.sortIndex = expirationTime;
    push(taskQueue, newTask);
    // wait until the next time we yield.


    if (!isHostCallbackScheduled && !isPerformingWork) {
      isHostCallbackScheduled = true;
      /**
       * flushWork 是一個比較重要的函數,涉及到清空 taskQueue 的操作
       * requestHostCallback 會觸發 MessageChannel 從而執行 performWorkUntilDeadline,後續也會詳細分析
       * 這裡可以把下面這段代碼理解為調用 flushWork 以清空 taskQueue 內的 task
      */
      requestHostCallback(flushWork);
    }
  }

  return newTask;
}
至此,根據上述邏輯我們可以繪製出下圖

接下來稍微看下 handleTimeout 裡面具體做了什麼
/**
 * 在 advanceTimers 整理完 timerQ 與 taskQ 後
 * 如果 taskQ 內有 task,便調度該 task
 * 否則檢查 timerQ 內是否存在 task,如果有便設置定時器到它的 startTime 再調用 handleTimeout
*/
function handleTimeout(currentTime) {
  isHostTimeoutScheduled = false;
  advanceTimers(currentTime); // 用來整理 timerQ 與 taskQ 的函數,見底下的分析

  if (!isHostCallbackScheduled) {
    if (peek(taskQueue) !== null) {
      /**
       * taskQ 不為空時,開始調度
      */
      isHostCallbackScheduled = true;
      // unstable_scheduleCallback 內也有相同的操作,是調度起始的入口
      requestHostCallback(flushWork);
    } else {
      /**
       * 這個時候 taskQ 裡面沒有任務可以調度
       * 只能來看 timerQ 裡面有沒有任務到 startTime 了
      */
      var firstTimer = peek(timerQueue);

      if (firstTimer !== null) {
        /**
         * 給 timerQ 的第一個元素設置定時器,等它到 startTime,
         * 然後用 advanceTimers 把 task 轉移到 taskQ 裡再調度
        */
        requestHostTimeout(handleTimeout, firstTimer.startTime - currentTime);
      }
    }
  }
}

/**
 * 不斷的遍歷 timerQ 把裡面到達 startTime 的 task 拿出來塞到 taskQ 裡面去
 * 除此之外,還負責把被取消掉的 task 丟掉
*/
function advanceTimers(currentTime) {
  // Check for tasks that are no longer delayed and add them to the queue.
  var timer = peek(timerQueue);

  while (timer !== null) {
    if (timer.callback === null) { // unstable_cancelCallback 取消任務時會把 task 的 callback 置空
      // Timer was cancelled.
      pop(timerQueue); // 這裡丟掉了被取消的 task
    } else if (timer.startTime <= currentTime) {
      // Timer fired. Transfer to the task queue.
      //  task 到 startTime 了,移到 taskQ 裡面去
      pop(timerQueue);
      timer.sortIndex = timer.expirationTime;
      push(taskQueue, timer);
    } else {
      // Remaining timers are pending.
      return;
    }

    timer = peek(timerQueue);
  }
}
入口相關的部分便分析結束,從上面的代碼中不難注意到 requestHostCallback (flushWork) 這一個代碼片段,而它也將成為我們分析調度行為的一個入口。
requestHostCallback#
requestHostCallback 可以說是 Scheduler 內觸發調度行為的一個入口,因此對它的解析也是分析 Scheduler 的重點之一。接下來我們來看一下它的實現。
/**
 * 根據 requestHostCallback(flushWork)
 * 此處的 callback 為 flushWork
*/
function requestHostCallback(callback) {
  scheduledHostCallback = callback; // 將 flushWork 賦值給 scheduledHostCallback

  if (!isMessageLoopRunning) {
    isMessageLoopRunning = true;
    schedulePerformWorkUntilDeadline(); // 關鍵函數
  }
}
上面代碼段內不難看出 schedulePerformWorkUntilDeadline 是其關鍵函數,然而其聲明區分了三種場景
- NodeJs 環境,面向服務端渲染 —— setImmediate
- 瀏覽器環境,面向 web 應用 —— MessageChannel
- 兼容環境 —— setTimeout
不過本文只關注分析瀏覽器環境,下面是其聲明。
var channel = new MessageChannel();
var port = channel.port2;
channel.port1.onmessage = performWorkUntilDeadline;

schedulePerformWorkUntilDeadline = function () {
  port.postMessage(null);
};
MessageChannel 請自行看 MDN,這裡只強調一點 MessageChannel 觸發的異步任務類型為 MacroTask,因此大多數情況下在該任務執行後總是會觸發瀏覽器的 render。
由上述代碼,每次調用 schedulePerformWorkUntilDeadline 都會觸發 performWorkUntilDeadline,那麼解下來看看這個函數裡面是什麼
var performWorkUntilDeadline = function () {
  /**
   * 這裡的 scheduledHostCallback 其實就是 flushWork
   * 詳細見 requestHostCallback
  */
  if (scheduledHostCallback !== null) {
    var currentTime = exports.unstable_now();

    startTime = currentTime;
    var hasTimeRemaining = true;

    var hasMoreWork = true;
    try {
      /**
       * 執行 flushWork,其返回值代表著 taskQ 是否為空
       * 如果不為空,則代表著仍然存在著需要被調度的 task
      */
      hasMoreWork = scheduledHostCallback(hasTimeRemaining, currentTime);
    } finally {
      /**
       * 如果
      */
      if (hasMoreWork) {
        // If there's more work, schedule the next message event at the end
        // of the preceding one.
        /**
         * 因為仍然存在需要調度的任務,便再次觸發 MessageChannel
        */
        schedulePerformWorkUntilDeadline();
      } else {
        isMessageLoopRunning = false;
        scheduledHostCallback = null;
      }
    }
  } else {
    isMessageLoopRunning = false;
  } // Yielding to the browser will give it a chance to paint, so we can
};
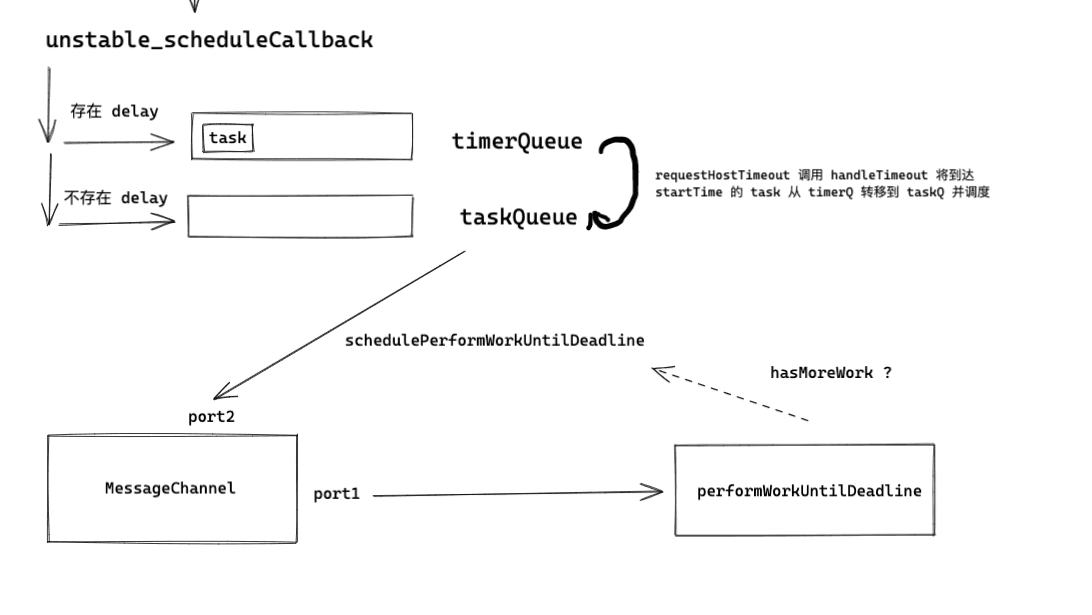
Scheduler 的示意圖在此時其實已經將大致框架畫出來了。

接下來需要補全 performWorkUntilDeadline 的內容,在接下來的分析過程中,我們很快就會講到時間切片相關的內容
flushWork 與 workLoop#
performWorkUntilDeadline 內會調用 scheduledHostCallback,而 scheduledHostCallback 不過是 flushWork 的別名。(見 requestHostCallback)
但 flushWork 內其實也只需要關注 workLoop 就行了,在 workLoop 內會涉及到時間切片與中斷恢復這兩個核心概念
/**
 * 其意義只是為了調用 workLoop
*/
function flushWork(hasTimeRemaining, initialTime) {
  /**
   * hasTimeRemaining 被賦值為 true
   * initialTime 為 performWorkUntilDeadline 調用時的時間戳
  */
  isHostCallbackScheduled = false;

  if (isHostTimeoutScheduled) {
    // We scheduled a timeout but it's no longer needed. Cancel it.
    /**
     * 優先清理 taskQ,為了防止定時器設置的內容插隊
     * 將已有的定時器 cancel 掉
    */
    isHostTimeoutScheduled = false;
    cancelHostTimeout();
  }

  isPerformingWork = true;
  var previousPriorityLevel = currentPriorityLevel;

  try {
    if (enableProfiling) {
      try {
        /**
         * 整個 flushWork 的重點其實就是調用 workLoop
        */
        return workLoop(hasTimeRemaining, initialTime);
      } catch (error) {
        if (currentTask !== null) {
          var currentTime = exports.unstable_now();
          markTaskErrored(currentTask, currentTime);
          currentTask.isQueued = false;
        }

        throw error;
      }
    } else {
      // No catch in prod code path.
      return workLoop(hasTimeRemaining, initialTime);
    }
  } finally {
    currentTask = null;
    currentPriorityLevel = previousPriorityLevel;
    isPerformingWork = false;
  }
}

/**
 * 循環 taskQ,執行每個 task 內的 callback
*/
function workLoop(hasTimeRemaining, initialTime) {
  var currentTime = initialTime;
  /**
   * 整理 timerQ 與 taskQ
  */
  advanceTimers(currentTime);
  currentTask = peek(taskQueue); // 獲取第一個 task

  while (currentTask !== null && !(enableSchedulerDebugging )) {
    /**
     * 如果任務已經過期且時間切片還沒有用完,才會繼續 while 循環,否則跳出
     * shouldYieldToHost 內存在這時間切片的內容,後面單獨分析
    */
    if (currentTask.expirationTime > currentTime && (!hasTimeRemaining || shouldYieldToHost())) {
      // This currentTask hasn't expired, and we've reached the deadline.
      break;
    }

    var callback = currentTask.callback;

    /**
     * callback 存在 function/null 兩種值
     * 如果是 function 就是有效的 task
     * 如果是 null 就是被 cancel 的 task
    */
    if (typeof callback === 'function') {
      currentTask.callback = null;
      currentPriorityLevel = currentTask.priorityLevel;
      var didUserCallbackTimeout = currentTask.expirationTime <= currentTime;

      /**
       * 如果用 Performance工具對這裡做記錄,
       * 不難發現這裡的 callback 其實是 performConcurrentWorkOnRoot
       * 而在那個函數內,在滿足 root.callbackNode === originalCallbackNode 時
       * 也就是原有的任務並沒有被執行完便會再次返回 performConcurrentWorkOnRoot 本身以重新恢復中斷的任務
       *
       * 補充一下,這裡之所以可能存在中斷的情況主要還是因為時間切片用完了,也就是 shouldYieldToHost() 的內容
       *
       * Tip: 這裡不要糾結太多,閱讀源碼最大的忌憚便是被細節卷進去(後續有時間會補充這一塊的調試記錄)
      */
      var continuationCallback = callback(didUserCallbackTimeout);
      currentTime = exports.unstable_now();

      if (typeof continuationCallback === 'function') {
        /**
         * 因為沒執行結束,因此重新給 task 的 callback 賦值,再下一次調用時也好恢復中斷的任務
        */
        currentTask.callback = continuationCallback;
      } else {
        /**
         * 這裡的話,是 task 順利執行結束了,因此可以把這個 task 給丟掉了
        */
        if (currentTask === peek(taskQueue)) {
          pop(taskQueue);
        }
      }
      /**
       * 分析過了,如果忘了往上面翻。。。
      */
      advanceTimers(currentTime);
    } else {
      /**
       * 因為是被 cancle 的 task
       * 所以沒有執行的必要,便將其 pop 掉
      */
      pop(taskQueue);
    }

    currentTask = peek(taskQueue);
  } // Return whether there's additional work

  /**
   * 即使因為時間切片用完了導致 while 循環中斷,也會進入下面的判斷邏輯
  */
  if (currentTask !== null) {
    // 如果是因為 while 循環中斷,那麼 currentTask 必然不為 null
    // 於是返回 true
    return true;
  } else {
    // 如果是因為 while 循環執行結束,那麼 currentTask 必然為 null
    var firstTimer = peek(timerQueue);

    if (firstTimer !== null) {
      // 只要 timerQueue 不為空,於是開始下一輪的調度
      requestHostTimeout(handleTimeout, firstTimer.startTime - currentTime);
    }
    // 因為任務執行完了,便不存在剩餘的任務了,於是返回 false
    return false;
  }
  // workLoop 的返回值其實就是被賦予給 hasMoreWork 的
}
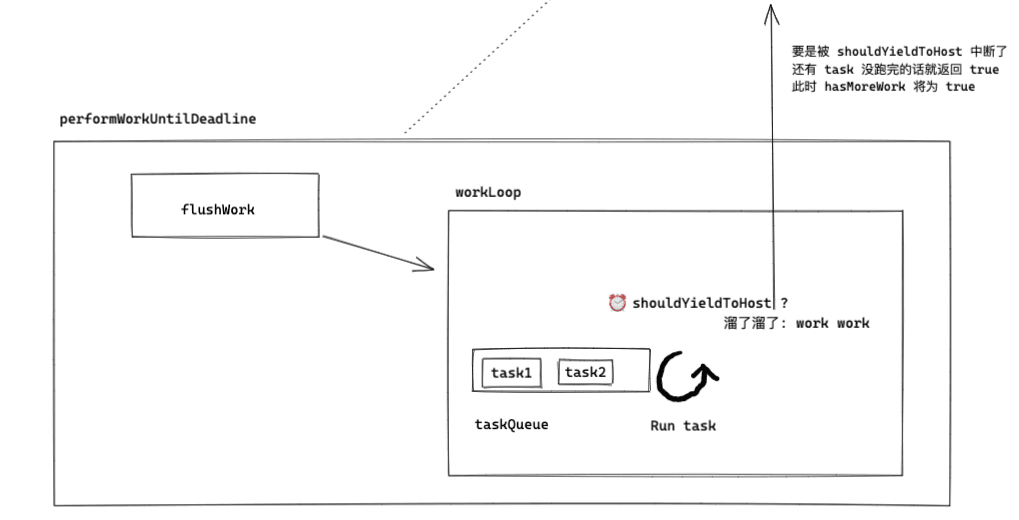
經過上方的分析,可以畫出 performWorkUntilDeadline 內的大致操作

接下來我們來看看這個時間切片是個什麼東西。。
function shouldYieldToHost() {
  /**
   * performWorkUntilDeadline 在執行起始時就會給 startTime 賦值
  */
  const timeElapsed = getCurrentTime() - startTime;
  /**
   * frameInterval 默認值是 5 ms
   * 不過也會根據顯示器的 fps(0, 125) 自動計算,計算方式為 Math.floor(1000 / fps)
   * 也就是一幀的毫秒數,而這個值就是時間切片
  */
  if (timeElapsed < frameInterval) {
    // The main thread has only been blocked for a really short amount of time;
    // smaller than a single frame. Don't yield yet.
    // 因為時間有的多,所以不用中斷
    return false;
  }

  // The main thread has been blocked for a non-negligible amount of time. We
  // may want to yield control of the main thread, so the browser can perform
  // high priority tasks. The main ones are painting and user input. If there's
  // a pending paint or a pending input, then we should yield. But if there's
  // neither, then we can yield less often while remaining responsive. We'll
  // eventually yield regardless, since there could be a pending paint that
  // wasn't accompanied by a call to `requestPaint`, or other main thread tasks
  // like network events.
  /**
   * 太長不看:我們要優先響應用戶輸入 balabala
  */
  if (enableIsInputPending) {
    if (needsPaint) {
      // There's a pending paint (signaled by `requestPaint`). Yield now.
      return true;
    }
    if (timeElapsed < continuousInputInterval) {
      // We haven't blocked the thread for that long. Only yield if there's a
      // pending discrete input (e.g. click). It's OK if there's pending
      // continuous input (e.g. mouseover).
      if (isInputPending !== null) {
        return isInputPending();
      }
    } else if (timeElapsed < maxInterval) {
      // Yield if there's either a pending discrete or continuous input.
      if (isInputPending !== null) {
        return isInputPending(continuousOptions);
      }
    } else {
      // We've blocked the thread for a long time. Even if there's no pending
      // input, there may be some other scheduled work that we don't know about,
      // like a network event. Yield now.
      return true;
    }
  }

  // `isInputPending` isn't available. Yield now.
  // isInputPending不管事,那麼中斷算了
  return true;
}
時間切片看著這名字牛逼哄哄,其實就是顯示器一幀耗時,然而為什麼要設計這麼個東西,其實道理也很簡單,如果 渲染進程 的主線程 一直被 JS 線程 給佔用,而 GUI 線程 無法介入,那麼頁面便會一直不刷新從而幀數下降,讓用戶感到卡頓。因此一旦執行任務的耗時超過了時間切片就需要立刻中斷任務從而讓瀏覽器刷新頁面。